At my current workplace, we operate with large tanks designed for storing huge quantities of chocolates. Regrettably, these tanks lack built-in sight glasses, imposing a burden on operators who must climb ladders frequently to gauge tank levels before initiating product transfers from the ball mill. One unfortunate incident occurred previously due to insufficient level awareness, resulting in chocolate overflow atop the tank. In response, we proposed a solution: constructing a dual-function digital level meter.
Firstly, the meter communicates with the PLC, notifying it when the tank reaches full capacity. This triggers an immediate signal to halt the transfer pump, averting potential overflows.
Secondly, a digital display unit was installed adjacent to the tank, facilitating quick and convenient monitoring of the chocolate product's current level within the tank.
Collaborating with a friend, we divided tasks: he managed sensor mounting fabrication, while I undertook sensor selection and the microcontroller's wiring and programming.
At the heart of this project lies an important hardware component – an IFM photoelectric distance sensor. Operating on the principle of laser light measurement, it generates a standard current output (4-20mA). The sensor boasts a maximum measurement range of 10 meters, aligning perfectly with our tank's height and volume parameters.
The 16 x 2 dot matrix LCD together with the Arduino Uno microcontroller will take care of the sampling of the analog signal from the sensor, do a simultaneous computation and display the level of the tank in real time.
To start the design we have to measure the dimension of the storage tank so that important values can be set in the sensor. The sensor will be mounted just below the lid so this will be also the sensor origin.
Start of signal (4mA) will appear at 1,450mm below from the sensor origin and the end of signal (20mA) will be at 250mm below the sensor origin.
Given that the sensor generates a current output, we need to convert this current into a 0-5V range, which is in line with the analog channels' specifications of our microcontroller. To fulfill this task, my chosen approach involves adding a 150 ohm resistor soldered in parallel with the (A0) analog channel of the microcontroller. This configuration effectively transforms the sensor's current output into an analog voltage range spanning from 0.6V to 3.0V.
Pin 1 of the sensor serves as the +24V power input, while the sensor's current output is directed to pin 2. This output will be directly connected to the A0 analog channel of our microcontroller. Pin 4 is a normally closed (NC) contact embedded within the sensor. When the product level exceeds the container's lid, this contact will open, triggering a signal sent to the PLC and prompting the transfer pump to halt. Finally, pin 3 functions as the common ground connection.
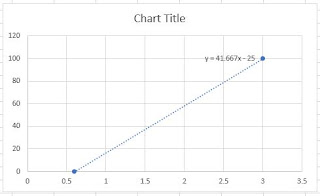
The tank's content will be visually reported as a percentage level, which we can achieve through mathematical calculations. Employing the Microsoft Excel application, we can create a chart and derive a linear expression from the sensor's range and the corresponding % level data. This linear expression, representing a calibration curve, will then be utilized by the microcontroller to execute calculations and accurately display the tank's % level.
calibration curve linear expression: Y= 41.667X-25
where Y is the % Level and X is the analog voltage sampled by the microcontroller at channel A0.
The difference in voltage between the photoelectric distance sensor and the microcontroller is efficiently managed by LM2596 buck down converter. This setup accommodates the sensor's operation at a 24Vdc rail while ensuring the microcontroller operates on a 5Vdc supply. Opting for a linear regulator like the 7805 proves unfeasible in this scenario due to the substantial difference between the input and output voltage levels.
After completing the hardware wiring and testing, our functional level meter is now put to test. Below are the actual pictures taken of the display unit installed near the tank.
I would like to thank my friend, sir Cliff for helping me complete this project. ---73 de du1vss


