Monday, September 26, 2022

Digital Tank Level Meter


At my current workplace, we operate with large tanks designed for storing huge quantities of chocolates. Regrettably, these tanks lack built-in sight glasses, imposing a burden on operators who must climb ladders frequently to gauge tank levels before initiating product transfers from the ball mill. One unfortunate incident occurred previously due to insufficient level awareness, resulting in chocolate overflow atop the tank. In response, we proposed  a solution: constructing a dual-function digital level meter.


Firstly, the meter communicates with the PLC, notifying it when the tank reaches full capacity. This triggers an immediate signal to halt the transfer pump, averting potential overflows.


Secondly, a digital display unit was installed adjacent to the tank, facilitating quick and convenient monitoring of the chocolate product's current level within the tank.


Collaborating with a friend, we divided tasks: he managed sensor mounting fabrication, while I undertook sensor selection and the microcontroller's wiring and programming.


At the heart of this project lies an important hardware component – an IFM photoelectric distance sensor. Operating on the principle of laser light measurement, it generates a standard current output (4-20mA). The sensor boasts a maximum measurement range of 10 meters, aligning perfectly with our tank's height and volume parameters.


The 16 x 2 dot matrix LCD together with the Arduino Uno microcontroller  will take care of the sampling of the analog signal from the sensor, do a simultaneous computation and display the level of the tank in real time.


To start the design we have to measure the dimension of the storage tank so that important values can be set in the sensor. The sensor will be mounted just below the lid  so this will be also the sensor origin.
Start of signal (4mA) will appear at 1,450mm below from the sensor origin and the end of signal (20mA) will be at 250mm below the sensor origin.


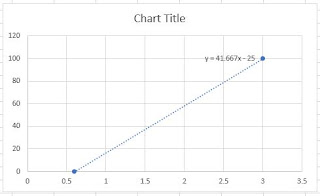
Given that the sensor generates a current output, we need to convert this current into a 0-5V range, which is in line with the analog channels' specifications of our microcontroller. To fulfill this task, my chosen approach involves adding a 150 ohm resistor soldered in parallel with the (A0) analog channel of the microcontroller. This configuration effectively transforms the sensor's current output into an analog voltage range spanning from 0.6V to 3.0V.


Pin 1 of the sensor serves as the +24V power input, while the sensor's current output is directed to pin 2. This output will be directly connected to the A0 analog channel of our microcontroller. Pin 4 is a normally closed (NC) contact embedded within the sensor. When the product level exceeds the container's lid, this contact will open, triggering a signal sent to the PLC and prompting the transfer pump to halt. Finally, pin 3 functions as the common ground connection.


The tank's content will be visually reported as a percentage level, which we can achieve through mathematical calculations. Employing the Microsoft Excel application, we can create a chart and derive a linear expression from the sensor's range and the corresponding % level data. This linear expression, representing a calibration curve, will then be utilized by the microcontroller to execute calculations and accurately display the tank's % level.


calibration curve linear expression: Y= 41.667X-25
where Y is the  % Level and X is the analog voltage sampled by the microcontroller at channel A0.


The difference in voltage between the photoelectric distance sensor and the microcontroller is efficiently managed by LM2596 buck down converter. This setup accommodates the sensor's operation at a 24Vdc rail while ensuring the microcontroller operates on a 5Vdc supply. Opting for a linear regulator like the 7805 proves unfeasible in this scenario due to the substantial difference between the input and output voltage levels.


After completing the hardware wiring and testing, our functional level meter is now put to test. Below are the actual pictures taken of the display unit installed near the tank.


 I would like to thank my friend, sir Cliff for helping me complete this project. ---73 de du1vss


Sunday, June 23, 2019

Programming TK-3000:M6


My new company just bought 10 pcs of Kenwood TK-3000:M6 radio to help our communication inside the plant but the supplier only provide a single programmed frequency in the channel knob. Another problem arise after we found out that the typical range of this unit is not sufficient to cover the entire plant and the only way to solve the problem is to deploy a repeater.

To begin with my repeater project, I need to construct first a programmer and found some some useful circuit here. "http://www.repeater-builder.com/kenwood/kenwood-software-and-cable-list.html" . I just use 2sc9013 NPN transistor and 1N4148 as required in the schematic.


Using my trusted "ugly construction technique", my programmer is now ready. Few more things needed in order to start programming and these are;

  • KPG-137D software from Kenwood
  • USB-Serial converter


Some settings in the KPG-137D needs to be set correctly such as the port number assigned in the usb-serial converter and the model / frequency range of the radio.


If you need a copy of the software just drop me a message below. ---73 de du1vss

Saturday, November 3, 2018

Voice Activated Repeater Controller Using LB1403N


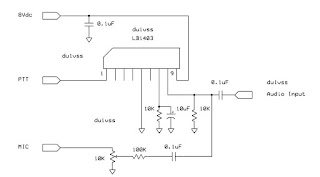
Here is my first attempt to construct a voice activated repeater controller using a VU driver IC LB1403N. Instead of driving a group of LEDs, the first pin is used to pull down the PTT (push to talk) of the transmitter. A small portion of the received audio is routed to the transmitter via the 100K, 0.1uF and 10K potentiometer.


The entire circuit is relatively simple and the only drawback is that it needs a high level of audio input coming from the receiver to keep the PTT close all the time during transmission. The protoype board is connected to my Icom IC-2200H as the transmitter and Icom IC-V80 as the receiver. ---73 de du1vss

Saturday, March 31, 2018

Mosfet Replacement in Pallet Amp Trick


I would like to share my trick in replacing the mosfet from pallet amplifier which I learned from my experiences in pallet fabrication and repairs. Most of us would like to unsolder those mosfet legs first one by one and is the most difficult to do since too much heating on those pcb pads would accidentally delaminate the copper from the board.

My shortcut in doing this is to cut the legs of the mosfet using a cutter blade but before doing this please make sure that the mosfet is verified defective!


After freeing the mosfet, now unsolder the remaining mosfet legs from the board using a soldering iron. Cleaned the board, apply fresh thermal paste and mount the new mosfet.  73 de du1vss

Sunday, January 28, 2018

DDS based VFO


Another weekend project is this variable frequency oscillator based from dds chip. I found this project useful in my home brew dsb transceiver and testing several filters and rf amplifiers.

I bought the dds chip from Lazada, the cloned arduino is from Alexan, and the lcd module is from E-Gizmo. The dds is able to generate an rf signal from 1MHz to 30MHz with adjustable tuning steps from 10Hz, 50Hz, 100Hz, 500Hz, 1KHz, 2.5KHz, 5KHz, 10KHz, 100KHz and 1Mhz.


A broadband rf amplifier is also included to boost the amplitude of the dds signal. Around 3V peak to peak was measured at 7Mhz and decrease gradually on higher frequencies.


Credit is given to AD7C in which the schematic and the arduino code was copied. The broadband rf amplifier is not shown however.


A beautiful 7MHz sinusoidal wave  can be seen in my Tektonix oscilloscope. One thing I observed however, the 125MHz reference clock is heating specially when the dds module is supplied with 5V but this did not affect the quality of the signal output generated by the module. One option is to use the 3.3V supply found in arduino uno but the signal level from the module is reduced. EMI and other interference could also stop the module from generating rf signal.    ---73 de du1vss

Sunday, November 12, 2017

Home Brew Static Wick


By theory, this device bleeds excess voltage potential of your tower and thus minimize the risk of direct lightning strike. This device is totally different from the lightning arrester and though it does not guarantee 100% protection but there is no harm in trying.

I made my wick from fine stainless wire cut 12 inches long. I prepared 15 pieces of these wires then I folded it in half and crimped them together in a 3/8" stainless tubing. The more pointed tips, the better it perform so it is your option. The wick can be attached to the highest portion of your tower and must be provided with grounding below.   73 de du1vss

Monday, August 28, 2017

Diode Ring Mixer


40m band is poor today and I want to listen to the AM broadcast band. However, my IC-M700TY HF transceiver can only go down to 2MHz.  Upon checking  my junk box, I found the right components to assemble an up converter so that I can still hear AM broadcasts on my transceiver.

The illustration above depicts a diode ring mixer, In my prototype, I am utilizing four closely matched 1N4148 diodes based on their forward voltage and a pair of  FT37-43 toroids as a core for my broadband transformer. The transformer is wound with four trifilar turns of #22 AWG insulated wire.

After completing the diode ring mixer, I constructed a 10MHz crystal oscillator using the circuit mentioned earlier. The oscillator is producing 2.8V peak-to-peak of 10MHz signal which I believe is well within the requirements for the diode ring mixer. The 10MHz signal will be fed into the VFO port of the ring mixer.


I've enclosed the finished prototype in a plastic container and I've installed a pair of connectors on the side for easy connection of the aerial antenna and the patch cable leading to the antenna connector of my IC-M700TY. The aerial antenna will be connected to the RF port while the baseband output signal can be extracted from the IF port of the ring mixer.


To make this set-up operational, the AM broadcast frequencies will be present at both (10MHz + AM band) and at (10MHz - AM band). For instance, if DZMM is broadcasting at 630KHz, it can be received either at 10.630MHz or at 9.370MHz   ---73 de du1vss