Tuesday, June 20, 2023
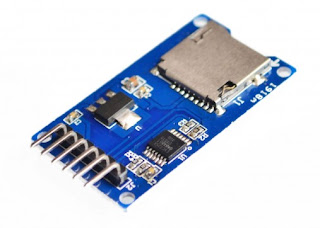
DIY Arduino Uno Data Logger
Wednesday, September 28, 2022
How to assemble an SWR / Power Meter for HF and VHF
A friend is asking if I can fabricate a low-cost SWR/power meter with accurate performance up to 144MHz. One of the designs I have attempted is the modified Bruene directional coupler from Roy Lewallen, W7EL.
During the calibration process, I am using my Diamond SX200 meter as a reference standard, and my ICOM IC-2200H is employed to verify the power readings for both power meters. Additionally, I have prepared three distinct dummy loads – each with impedance values of 50 ohms, 75 ohms, and 100 ohms respectively. These dummy loads are necessary components for SWR calibration.
Assembling this project is relatively straightforward for me; however, the calibration process presents challenges. Notably, around 150MHz, there is a noticeable decline in power response. It appears that this might already be pushing the upper limits of my power meter's capabilities. Moreover, I've observed toroid transformer heating, particularly during continuous 60W testing.
I extend my heartfelt gratitude to my friend, Sir Leandro, for placing trust in and providing unwavering support for this undertaking. --- 73 de DU1VSS
Monday, September 26, 2022
Digital Tank Level Meter
At my current workplace, we operate with large tanks designed for storing huge quantities of chocolates. Regrettably, these tanks lack built-in sight glasses, imposing a burden on operators who must climb ladders frequently to gauge tank levels before initiating product transfers from the ball mill. One unfortunate incident occurred previously due to insufficient level awareness, resulting in chocolate overflow atop the tank. In response, we proposed a solution: constructing a dual-function digital level meter.
Firstly, the meter communicates with the PLC, notifying it when the tank reaches full capacity. This triggers an immediate signal to halt the transfer pump, averting potential overflows.
Secondly, a digital display unit was installed adjacent to the tank, facilitating quick and convenient monitoring of the chocolate product's current level within the tank.
Collaborating with a friend, we divided tasks: he managed sensor mounting fabrication, while I undertook sensor selection and the microcontroller's wiring and programming.
At the heart of this project lies an important hardware component – an IFM photoelectric distance sensor. Operating on the principle of laser light measurement, it generates a standard current output (4-20mA). The sensor boasts a maximum measurement range of 10 meters, aligning perfectly with our tank's height and volume parameters.
Sunday, June 23, 2019
Programming TK-3000:M6
Using my trusted "ugly construction technique", my programmer is now ready. Few more things needed in order to start programming and these are;
- KPG-137D software from Kenwood
- USB-Serial converter
Some settings in the KPG-137D needs to be set correctly such as the port number assigned in the usb-serial converter and the model / frequency range of the radio.
If you need a copy of the software just drop me a message below. ---73 de du1vss
Saturday, November 3, 2018
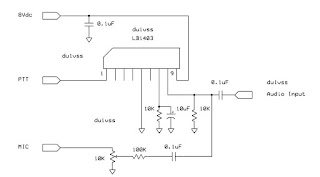
Voice Activated Repeater Controller Using LB1403N
The entire circuit is relatively simple and the only drawback is that it needs a high level of audio input coming from the receiver to keep the PTT close all the time during transmission. The protoype board is connected to my Icom IC-2200H as the transmitter and Icom IC-V80 as the receiver. ---73 de du1vss
Saturday, March 31, 2018
Mosfet Replacement in Pallet Amp Trick
I would like to share my trick in replacing the mosfet from pallet amplifier which I learned from my experiences in pallet fabrication and repairs. Most of us would like to unsolder those mosfet legs first one by one and is the most difficult to do since too much heating on those pcb pads would accidentally delaminate the copper from the board.
My shortcut in doing this is to cut the legs of the mosfet using a cutter blade but before doing this please make sure that the mosfet is verified defective!
After freeing the mosfet, now unsolder the remaining mosfet legs from the board using a soldering iron. Cleaned the board, apply fresh thermal paste and mount the new mosfet. 73 de du1vss
Sunday, January 28, 2018
DDS based VFO
Another weekend project is this variable frequency oscillator based from dds chip. I found this project useful in my home brew dsb transceiver and testing several filters and rf amplifiers.
I bought the dds chip from Lazada, the cloned arduino is from Alexan, and the lcd module is from E-Gizmo. The dds is able to generate an rf signal from 1MHz to 30MHz with adjustable tuning steps from 10Hz, 50Hz, 100Hz, 500Hz, 1KHz, 2.5KHz, 5KHz, 10KHz, 100KHz and 1Mhz.
A broadband rf amplifier is also included to boost the amplitude of the dds signal. Around 3V peak to peak was measured at 7Mhz and decrease gradually on higher frequencies.
Credit is given to AD7C in which the schematic and the arduino code was copied. The broadband rf amplifier is not shown however.
A beautiful 7MHz sinusoidal wave can be seen in my Tektonix oscilloscope. One thing I observed however, the 125MHz reference clock is heating specially when the dds module is supplied with 5V but this did not affect the quality of the signal output generated by the module. One option is to use the 3.3V supply found in arduino uno but the signal level from the module is reduced. EMI and other interference could also stop the module from generating rf signal. ---73 de du1vss


