Saturday, November 9, 2013

Two Stack Dipole Using Power Divider


My friend ask me If I can make a two stack dipole for his 92.9MHz FM station and I decided to construct this project using a home made coaxial power divider using a two piece quarter-wave long 75 ohm coaxial cable. The two 75 ohm coax was connected in parallel to obtain 37.5 ohm which is the required impedance for our power divider. I also use a 1 wavelength long 50 ohm coax feeding the two dipoles and along with it, a short piece of wire that act as a pawsey stub that makes the dipole feed point balance. The 1 wavelength long 50 ohm coax was also chosen so that each dipole can be vertically spaced at 1 wavelength for gain optimization.


A plastic element insulator hold the dipole segments on a 1"x1" square tube boom. The feed point connection was carefully protected with a layer of rubber tape and on top of it is an electrical tape for UV and water protection.

A  fabricated  bracket  will hold the antenna boom and this was made of a thick plastic material, the one used here was a chopping board 5mm in thick.


A close up view of the coaxial power divider during initial tuning and testing.


A quick frequency sweep was made to evaluate the antenna SWR after the trimming of dipole segments. The antenna bandwidth was quite narrow for this design and I was able to obtain an SWR value of 1:1.2 across 92MHz to 93MHz only.


During testing, the two dipoles were spaced 1 wavelength horizontally and was 1 meter above the ground  just only to evaluate the SWR and tune the antenna while at the ground. When installed permanently, this antenna is expected to yield  3dBd of gain theoretically.    73 de du1vss

Saturday, July 6, 2013

Switch Mode Power Supply Unstable Output Cure


I got this switch mode power supply from a friend and my plan was to use this on my 80W linear amp. Things went the other way when I tested this supply with my 80W amp. The output voltage won't stay at 12V and every time i keyed my transceiver, the output voltage swings to 15V and sometimes the worst hitting a peak at 17V which by any moment will surely blow the PA transistor of my amp. It took me a quite a while to figure out what was causing the issue but then it was the stray RF reaching the PWM switching regulator IC was the main culprit. My verification includes bringing a 6W portable hand held transceiver close to the switch mode power supply and pressing the PTT while monitoring the output voltage of the power supply. Every time i pressed the PTT the output voltage jumps to 17V  and the proximity of the rubber ducky antenna is directly proportional to the increased in output voltage of the power supply.


I got the courage to disassemble the switch mode power supply to access the circuit board and found the only chip mounted on the board. It was a AZ7500E pulse width modulator regulator chip that runs this power supply and found some important pins that are responsible for its regulation. I tried to bypass to ground pin1 and pin16 (both were (+) inputs of its built-in error amplifier) using a 0.01uF ceramic capacitor. After the modification I quickly reassembled the power supply and test again for stability and surprisingly works now normally. --- 73 de du1vss

Home Brew 60W RF Dummy Load

Another great way of making your own 60 watts dummy load is by the use of Caddock thick film power resistor.  Purchased some of these at http://philippines.rs-online.com/web/ which cost  at 270 Pesos each. Two 100 ohm / 30W resistors were paralleled to make a 50 ohm / 60W dummy load. The good thing about this product is that it comes in TO-220 package and mounting this on a suitable aluminum heat sink is a big help in heat dissipation during actual use. Been able to test my prototype on VHF and provides a very good matched at 144MHz exhibiting an SWR value of 1.1:1 across the amateur band due to the fact that reactive components can be easily minimized because of the unique package of this resistor.


Thermal compound was added between the aluminum surface in contact with the power resistors. A pig tail coax to PL259 connection was also included but a slight increase in SWR was noted. 73 de du1vss

Saturday, June 15, 2013

Jpole Antenna with a Twist


Here is my own version of my Jpole antenna used in my ham station. Only the half wave radiator was exposed while the remaining quarter wave stub was kept inside on pvc pipe. The pvc pipe prevents rain water from entering the feed point that might affect the vswr of the antenna when raining. It also provides the required structure for our Jpole since this type of antenna works best if kept insulated from the tower.
The half wave radiator is made of 3/8" anodized aluminum tubing while the pvc pipe diameter is 1 &1/4". Marine epoxy was used to secure the half wave radiator into the center of the pvc coupling.


Several patches of (4" x 1") cartoon or thick cardboard used as spacer in the stub. Keep in mind that the 1 inch spacing of the stub is critical since the stub is actually a ladder line but only shorted at the bottom. Finding the exact position of the feed point is done by trial and error and of course with the aid of your swr meter. After the actual tuning, I found my feed point to be at 0.05 wavelength from the bottom of the stub.The inclusion of the pawsey stub is only my personal preference to minimize feed line radiation but other methods can be used here.
Once completed, secure your Jpole antenna using a pair of scaffolding clamp on the top of your tower.   --- 73 de du1vss

Saturday, August 25, 2012

Instant Dynamic Microphone. Almost!


It is true that the FET microphone (EM-80), or the electret condenser microphone provides stronger audio level as compared to a dynamic microphone. This project uses the internal FET of an electret condenser microphone to boost the audio signal of an ordinary dynamic microphone. Take note! no other electronic components needed, just the EM-80 electret condenser microphone.

The internal FET is K596 but i am not sure if it will work if you will use a general purpose FET like the MPF102 but anyway, you may find the nail cutter as a useful tool in prying out the aluminum can in order to extract the K596.

Once disassembled, you can find the thin metallic diaphragm used by the EM-80 separated by a plastic ring insulator. This actually a variable capacitor that changes its capacitance once the sound wave strike to the diaphragm. The changes in capacitance is then amplified by the K596 internal FET found inside the EM-80. You can now discard the thin diaphragm and the plastic insulator since we will not be needing them anyway. Now solder a piece of wire to the gate (perforated disk), as shown in the illustration below.


The audio input is soldered to the perforated disk in the EM-80 while the audio out is connected to the (+) positive terminal found at the back of the EM-80. The common ground is the (-) negative terminal found also at the back of the EM-80. Now the three wires are ready, all we need to have is the dynamic microphone.

Connection is simple, one of the wire of the dynamic microphone is connected to the input while the other wire is connected to the common ground. The audio output is the taken at the output terminal of our EM-80 while the negative terminal serves as a common ground to our FET amplifier. Once finished, the unit should now working properly. No need for a volume control since the audio gain of the FET is just sufficient and in good reproduction of the dynamic microphone sound quality.

The idea of this project is that we simply replaced the electret diaphragm of the EM-80 with a dynamic microphone. I had modified one of my Carol dynamic microphone fitted with my instant FET pre amp and works perfectly with my Icom IC-2200H  ... 73 de hevir.

5Watts RF Amplifier for FM Broadcast


This project was realized for the need of boosting the rf signal of an ordinary FM modulator . Most of these FM modulators available on the market have an rf output of less than 5mW in which effective range was very limited. The circuit above contains several rf stages combined together in a 2"x 2" double sided PCB board. The two rf transistors namely 2N2222 and 2SC2053 do not need heat sink except for the 2SC1971 final rf transistor. There are two supplies required to operate this amplifier, the Vcontrol and the Vcc. The Vcontrol is designed to directly control the rf output of this amplifier therefore it should be adjustable from 6V to 12V. You may include a variable regulator like 317 but I have used the 7805 configured to be adjustable for the Vcontrol section. The Vcc is normally at 12V and at least 3 amperes. You can use 13.8V as well but be reminded that this will force the 2SC1971 to operate at a higher power output and will greatly increase the junction temperature and for safety reason 12V is recommended. Before tuning this amplifier, rotate all the trimmer capacitors to a 50% mesh position and set the Vcontrol at 11V. Set the FM modulator at the center of the broadcast band which in this case at 98MHz. Tuning process starts from the two trimmer capacitors found at the output section of the 2SC1971. Use a 50 Ohm dummy load together with a power meter and adjust these trimmers for a peak power then you may follow the other two trimmer capacitors located at the input section. Repeat this process few times until the rf output maximize. Double check the rf output at 88MHz and note the rf power, do the same at 108MHz.


The rf power output of this amplifier should give you a fair broadband characteristic and power level across the broadcast band should not drop too low. Note that you may reach 8W for the maximum power but this will put to much stress to our 2SC1971. You may now reduce the voltage at the Vcontrol to a lower value depending on your power level requirements.   ---73 de hevir

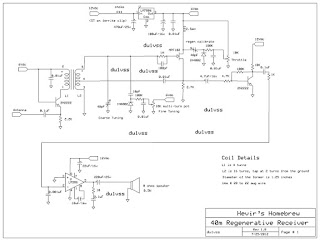
40m Regenerative Receiver


The first regenerative receiver was invented by Edwin Armstrong in 1914 and was been a standard receiver both for commercial and in amateur use long before the spread of super regenerative receiver. The circuit above was basically derived from the earlier works of Charles Kitchin, N1TEV and was modified for several improvements. Regenerative detectors able to detect nearly all types of signals including AM, CW, single-side band (SSB) and FM despite of its simplicity and fewer part counts. They tend also to consume less power, cost less and are easier to home brew than any other receiver.

The main modification of this project from the original design was the reduction of the variable air capacitor which due to the lack of availability of this item nowadays. It uses two tuning diodes (basically 1N4002 in reverse bias) to control the Fine Tuning and the other one is for the Throttle adjustment. A single transistor audio pre-amp was also included between the main input of the 386 main audio amplifier IC for added audio gain.


The tuning diodes provide a smooth adjustment of the Fine Tuning and of the Throttle control (regen). Stability isn't a problem at all.. small frequency drift may be noted on the first few minutes after power up which usually requires some warm up period. Once the receiver is up.. minor adjustment may be needed to clarify audio reception in single-side band (SSB).


This project was housed in a plastic casing but the original author suggested that wooden base may be used to avoid interaction with the air core transformer thereby reducing the "Q". First time user may require a little bit of control and manual adjustment specially the Throttle (regen). For AM reception, the detector must be adjusted just before oscillation and for CW, the regen may be moved a little over oscillation. When receiving SSB, the regen may be moved a little higher specially when receiving a stronger station to prevent frequency blocking.


The air core transformer contains the primary and secondary turns of # 22 magnetic wire. The core itself was made of 1.25" diameter of pvc pipe cut approximately 2" of length. Spacing of the primary turns to the secondary turns was about 1/4" but if you want some tight coupling a 1/8" spacing may be fine. The placement of the air core transformer is also important. Avoid placing the core in close proximity of metal objects such as speaker or transformer to avoid any unwanted effects. Placing the 12V power supply inside the receiver is not advisable since it will induce severe hum on the receiver's audio. The 12v wire going out to the external power supply must also be well filtered. I found out that 5 turns of the wire over a ferrite clip is already satisfactory. For my prototype receiver, a wire 10 meters in length acts a long wire antenna provides a sufficient reception of several DX stations heard in my area. Have fun with this project as I did. 73 de du1vss